

Getting temperature profiles right in polypropylene extrusion makes the difference between smooth production and costly defects. We’ve seen operations waste hours chasing problems that trace back to one poorly set barrel zone. PP melts between 160–170°C, but your extruder zones need to sit 20–80°C higher to handle viscosity, shear, and throughput demands.
The right profile balances solid conveying in the feed section, controlled melting through the compression area, and stable flow at the die. Set zones too cold and you’ll fight bridging or incomplete melting. Push them too hot and you risk thermal degradation, yellowing, and shortened equipment life. This guide walks you through the reasoning behind each zone and gives you working ranges drawn from production data.
Why Zone 1 Temperature Matters More Than You Think
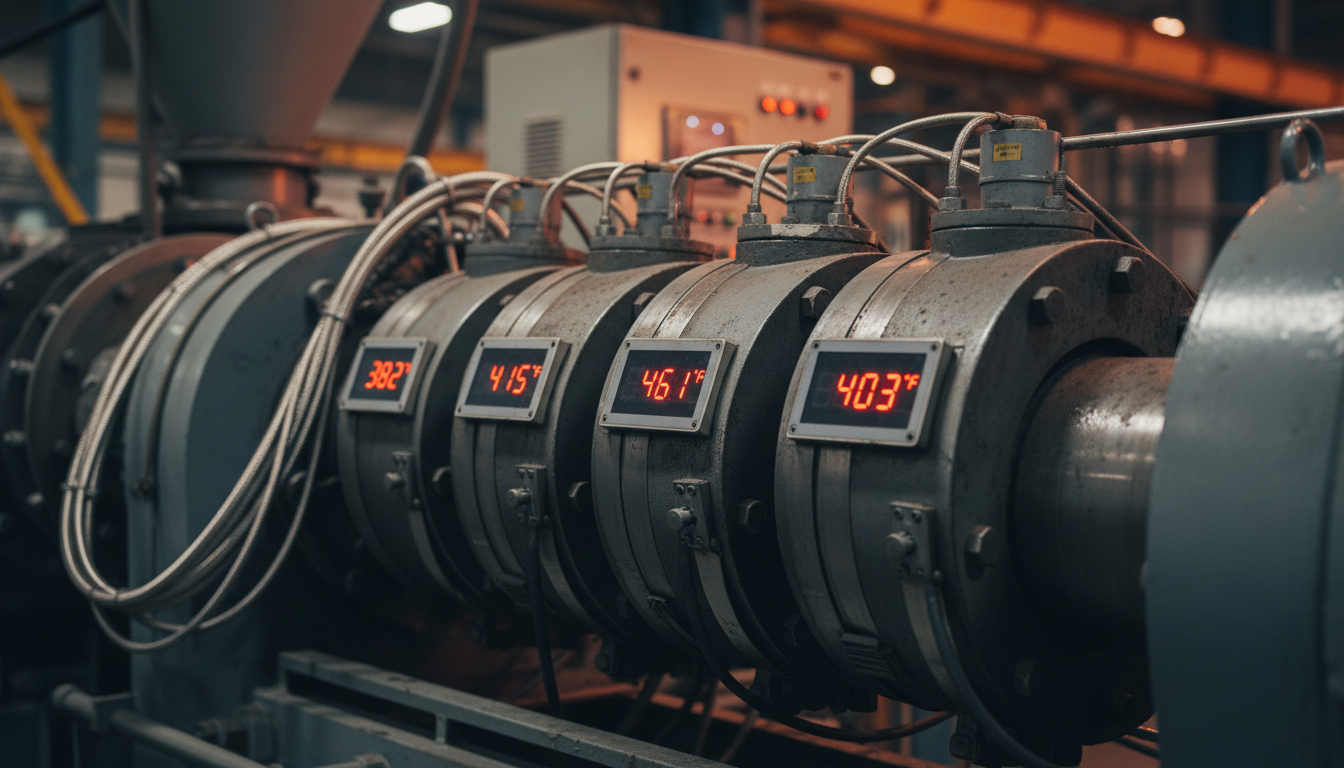
Zone 1—the feed throat and first barrel section—does more than just move pellets. It preheats incoming resin while keeping it solid enough to grip the screw flights. Set this zone 10–25°F below your target melt temperature. For most PP sheet and film grades, that means 380–420°F (193–216°C).
Run Zone 1 too hot and pellets soften before they enter the compression zone. The result? Bridging in the feed throat, erratic feeding, and surging output. We recommend keeping the feed throat itself warm to the touch—around 110–120°F—to preheat resin without causing blockages.
Testing shows that raising Zone 1 from 200°C to 240°C can increase output by 7–21%, depending on resin grade and screw geometry. But there’s a ceiling. Once you hit the temperature where pellets start to soften, further increases drop efficiency and stability. Find that sweet spot by adjusting in 10°C steps and watching motor current and pressure readings.
Setting Up the Melting Zones for Smooth Flow
Zones 2 through 4 handle the transition from solid pellets to homogeneous melt. These zones should step upward by 10–20°F from Zone 1 to the adapter, creating a gradual ramp that avoids thermal shock and gives the polymer time to absorb heat.
A typical profile for PP sheet extrusion looks like this:
– Zone 2: 400–440°F (204–227°C)
– Zone 3: 410–450°F (210–232°C)
– Zone 4: 440–470°F (227–243°C)
The goal here is to soften the resin without rushing the melt. PP has a melting peak at 165°C, but full fusion and proper viscosity require higher barrel temperatures because heat transfer from the barrel competes with shear heating from the screw.
Flat or inverted profiles—where middle zones run cooler than Zone 1—cause problems. The polymer doesn’t drop viscosity fast enough to pass through tight barrier sections, driving up barrel pressure and accelerating wear on flights and barrel surfaces.
Adapter and Die Settings That Prevent Defects
Your adapter and die zones control final melt temperature and flow uniformity. Set both to match the resin supplier’s recommended melt temperature: 440–470°F (227–243°C) for most extrusion-grade PP.
Die temperature affects viscosity at the point of shaping. Too cold and you’ll see die lines, poor surface finish, or uneven thickness. Too hot and the melt sags or causes color shift. For coat-hanger dies used in sheet work, we run five zones between 380–470°F (193–243°C), with the center zone 10–20°F hotter to compensate for slower flow in the middle of the die lip.
Back pressure also plays a role. Maintain 1500–2500 psi at the adapter to keep the melt homogeneous and prevent air entrainment. If pressure drops below 1000 psi, you risk inconsistent melt quality and surface defects like dimpling.
How Melt Temperature Relates to Barrel Settings
Barrel zone settings are not the same as melt temperature. Melt temperature—typically measured at the die exit—reflects the combined effect of barrel heat input, screw shear, and residence time. For PP, target melt temperature sits between 450–480°F (232–249°C).
Even when barrel zones are set 10–30°F below target melt, viscous shear from the screw adds enough energy to reach the desired discharge temperature. This is why high-speed lines often run cooler barrel profiles than slow lines—the screw does more of the heating work.
If your melt temperature runs too high, don’t drop all zones at once. Start by lowering the last two metering zones by 10°F and monitor the result over 10–15 minutes. Dropping feed zones first can destabilize solids conveying and cause worse problems than the original temperature issue.
Common Temperature-Related Issues and Fixes
Streaks or discoloration: Usually caused by excessive temperatures in the rear zones. Lower Zones 2 and 3 by 10–15°F to reduce residence time at high heat.
Surging or erratic output: Often tied to Zone 1 being too hot or too cold. Adjust in small increments and watch for stable pressure readings before making further changes.
Black specks: A sign of thermal degradation or contamination. Check that no zone exceeds 470°F, and verify that the die isn’t trapping polymer in dead spots where it can overheat.
Poor surface finish: Can result from die temperatures that are too low. Raise die zones by 5–10°F to improve flow and reduce melt fracture.
Air bubbles or splay: Points to moisture in the feed or excessive rear-zone temperatures pulling air into the melt. Dry resin for 2 hours at 80°C if using copolymer grades, and reduce Zone 2 by 10°F.
Optimizing Your Profile for Different PP Grades
Not all polypropylene is the same. Homopolymer, random copolymer, and impact copolymer each respond differently to temperature.
Homopolymer PP has a narrow melting range and higher crystallinity. It tolerates slightly higher barrel temperatures without degrading but also requires tighter control to avoid bridging in the feed zone.
Random copolymers melt over a broader range and flow more easily at lower temperatures. You can often run the entire profile 10–15°F cooler than homopolymer while maintaining good output and surface quality.
Impact copolymers contain rubber modifiers that soften earlier. Keep Zone 1 on the cooler end—around 380–400°F—to prevent premature softening that disrupts solids conveying.
Monitoring and Adjusting During Production
Temperature control doesn’t end once you dial in a profile. Barrel zone thermocouples drift, heater bands age, and ambient conditions change throughout the day. We check and record zone temperatures every 2 hours and compare them to baseline profiles.
Watch your motor current as a proxy for viscosity and back pressure. A sudden drop often means one of the metering zones has overheated and thinned the melt too much. A spike suggests solids aren’t melting fast enough or a zone has lost heating capacity.
Most modern extruders use PID controllers with auto-tuning. Let the system stabilize for 20–30 minutes after any temperature change before evaluating results. Rushing adjustments leads to oscillations and wasted resin.
Conclusion
Mastering temperature profiles for polypropylene extrusion isn’t about memorizing one “perfect” setting. It’s about knowing the role each zone plays and how to adjust when conditions change. Start with proven ranges—380–420°F in Zone 1, stepping up to 440–470°F at the die—and refine from there based on resin grade, screw design, and output targets.
Track your settings, log the results, and build a reference library for each material you run. Small adjustments in Zone 1 can shift output by 20%. Tightening die temperature control eliminates surface defects. And keeping the entire profile within safe limits protects your equipment and your product quality.
Ready to take your polypropylene processing to the next level? We supply extrusion-grade PP tailored for film, sheet, and profile applications, backed by technical support that helps you dial in the right profile for your operation. Check out our full range of polypropylene grades or reach out to discuss your specific requirements.
FAQs
What temperature should I set Zone 1 for polypropylene extrusion?
Set Zone 1 between 380–420°F (193–216°C), roughly 10–25°F below your target melt temperature. This keeps pellets solid enough for reliable feeding while preheating them for melting downstream. Adjust in 10°F steps while watching output rate and motor current to find the optimal point for your specific resin and screw.
Why does my PP extrusion show black specks or discoloration?
Black specks indicate thermal degradation from zones set too high or polymer trapped in dead spots. Keep all zones below 470°F and check that no barrel section exceeds 480°F. Also inspect the die for areas where polymer can stagnate and overheat. Lowering rear zones by 10–15°F often solves discoloration.
How do I know if my barrel temperature profile is correct?
A correct profile produces stable output with consistent melt temperature, smooth surface finish, and no surging. Monitor motor current and die pressure—sudden changes signal problems. Record temperatures every 2 hours and compare against your baseline. If heaters cycle frequently or zones consistently overshoot setpoints, your profile needs adjustment.
Can I run the same temperature profile for homopolymer and copolymer PP?
Not quite. Homopolymer has a narrow melt range and tolerates higher temperatures, while random copolymer flows easier and runs 10–15°F cooler across all zones. Impact copolymer softens earlier and needs a cooler Zone 1 to avoid feed issues. Always verify the resin supplier’s recommended melt temperature and adjust your profile accordingly.
What melt temperature should I target at the die for PP extrusion?
Target 450–480°F (232–249°C) at the die exit for most extrusion-grade polypropylene. This range provides good flow for shaping while staying well below the degradation threshold around 500°F. Measure melt temperature with a probe thermometer, not just barrel zone readings, since shear heating adds 20–50°F beyond what the zones indicate.